Create a logbook from the first card
The first card on the page is the create form. Enter a name, optionally add a description, then choose the logbook type, default language, and preferred view before saving.
Use the additional details button when you need the extra panels for view-specific settings, connector options, or opening balances. Keep the main panel visible when you only need a quick standard logbook.

- Enter the logbook name.
- Add a description if you want to distinguish this logbook from others.
- Choose the logbook type, language, and preferred view.
- Open additional details only when you need connector settings, view-specific settings, or opening balances.
- Save the logbook and confirm that it appears as a new management card.
Switch, update, archive, or reactivate existing logbooks
Every saved logbook appears as its own management card. Use the card controls to edit settings, make one logbook the default workspace, or copy the setup when you want a similar logbook without starting from nothing.
After a logbook has at least one entry recorded, its logbook type is locked. To switch a logbook between Flight Crew and Cabin Crew, delete all entries in that logbook first, then change the type.
When a logbook becomes inactive because of a plan limit or a deliberate archive choice, the card shows that state clearly. Inactive logbooks remain visible so you can understand what happened and reactivate them later if your plan allows it.
The card header shows whether the logbook is the current workspace, the default logbook, or archived. Current means pages such as Dashboard, Add flight, My Flights, Analytics, and Connect flights are using that logbook right now. Default means the system should open that logbook automatically when you start a new session or when no specific logbook is requested.
- Open the card of the logbook you want to manage.
- Edit the settings when the name, language, view, or connector options need to change.
- Set a logbook as default when you want it to open as your main workspace.
- Duplicate a logbook when you want a similar setup without re-entering everything manually.
- Archive or reactivate only after confirming the effect on your day-to-day work.
Use the card buttons and More settings carefully
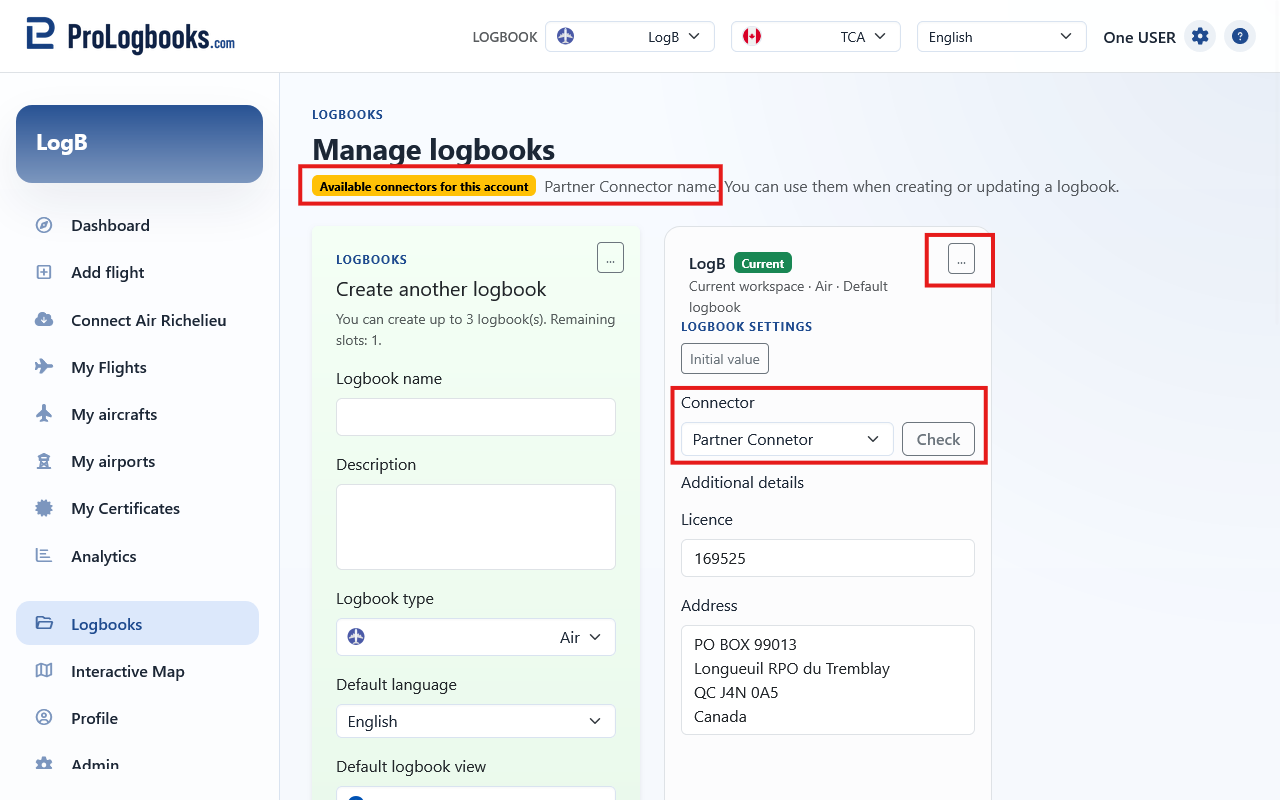
The “...” button on each logbook card switches between the main card fields and More settings. The main fields cover the logbook name, description, type, default language, preferred view, and whether the logbook should open by default. More settings contains the Initial value button, connector selector, connector Check button, and any extra fields required by the selected logbook view.
Default makes that logbook the one the app opens first. Copy duplicates the logbook setup, including linked custom aircraft registrations and custom airports, when your plan still has a logbook slot available. Save stores changes made on the card. Delete removes an unused logbook, or offers Set inactive when the logbook has related data that should be kept. Active reactivates an archived logbook when your plan has an active logbook slot available.
A connector is available in More settings only when your plan includes connector access and the partner connector has allowed your ProLogbooks email address. If a connector is available, the top of the Logbooks page also lists the available connector names. If the selector shows None only, contact the partner connector if you believe you should be entitled; ProLogbooks does not manage partner connector user lists.
To make connector flights appear from the Dashboard and become available for Preview, Resync all, Import, or Sync workflows, select the connector in that logbook’s More settings and save the card. Then make that logbook current by choosing it from the logbook switcher or by setting it as the default. The Dashboard and navigation show connector actions only for the current logbook when that logbook has a saved connector.
- Open the logbook card and press “...” to show More settings.
- Choose the connector from the Connector field, or leave it as None for a normal logbook with no connector sync.
- Use Check to confirm the selected connector can validate your account with the partner endpoint.
- Save the logbook card.
- Switch to that logbook or mark it as Default so the Dashboard uses it.
- Return to the Dashboard and use the connector action when the linked logbook is current.
If something goes wrong
- If you cannot create another logbook, you may have reached the plan limit for active logbooks on this account.
- If connector controls are locked, the current plan may not include connector access.
- If no connector appears in More settings, the partner connector may not have allowed your ProLogbooks email address yet.
- If the Dashboard does not show connector actions, confirm that the current logbook is the one with the connector selected and saved.
- If a logbook is marked archived or inactive, open the account plan page to see whether a plan change is required before reactivation.