Refresh the preview and read the warning badges first
When you open the connector page, the system can load a preview of available flights from the linked connector. The badges above the table tell you whether some registrations or airports still need to be resolved before import.
If a preview is already staged, the page may ask whether you want to continue with the current preview or resync everything. Continue keeps the staged rows and any corrections you already made. Resync all asks the connector for a fresh preview and replaces the staged review data, so current preview edits, resolved cells, and row-level changes can be lost.
Read those badges carefully. They are often the fastest sign that imported data is incomplete or does not yet match your local catalog entries.

- Open the connector page from the dashboard or from the linked logbook tools.
- Choose Continue preview when you already started reviewing and want to keep the current staged rows.
- Choose Resync all only when you want to discard the current staged review and reload the latest data from the connector.
- Read the warning badges above the table before you try to import anything.
- If the badges show unresolved registrations or unresolved airports, stop and fix those items first.
Choose Preview or Resync all when a preview already exists
When staged connector flights already exist, opening Connect flights may show a choice dialog. Choose Preview to continue reviewing the current staged rows, including any fixes you already made. Choose Resync all only when you want to discard the staged review and replace it with the latest rows returned by the partner connector.

Work through large connector imports in batches
Connector preview loads up to 250 partner rows at a time. This keeps large imports reliable and prevents the connector request from timing out when a user has hundreds or thousands of flights.
If the partner connector has more rows available, finish reviewing the current preview first. Resolve the yellow cells, ignore any rows you do not want in this logbook, then use Import all to process the importable rows. After that, open Connect flights again or choose Resync all to load the next batch.
Ignored rows count as reviewed for that batch. They stay linked to this logbook as ignored partner rows, so they should not block the next 250 rows after the batch is completed.
- Load the connector preview.
- Review the rows currently shown, up to 250 at a time.
- Resolve registrations and airports that are highlighted in yellow.
- Use Ignore preview flight for rows you intentionally do not want to import.
- Choose Import all when the current batch is ready.
- Repeat the preview and import cycle until no more connector rows are returned.
Resolve yellow registration cells
A registration cell highlighted in yellow means the connector flight refers to an aircraft registration that is not yet matched inside the current logbook. Import will remain blocked or incomplete until you resolve it.
When you click the unresolved registration cell, the page opens an inline editor and can guide you into the custom registration dialog if the registration does not already exist in the system.

- Click the yellow registration cell on the preview row.
- Type or confirm the registration value.
- If the registration does not exist yet, use the dialog to create it.
- In the dialog, confirm the registration, add an optional description, and choose the linked aircraft type.
- Save the custom registration and wait for the preview row to refresh.
- Confirm that the yellow warning is gone from that registration cell.
Resolve yellow airport cells
A departure or arrival airport cell highlighted in yellow means the connector could not match that airport to a known airport in the current logbook. The row should be corrected before import so route data and later map displays remain reliable.
When you click the unresolved airport cell, the page can open the airport creation flow and let you confirm the airport name and map position before saving it.

- Click the yellow departure or arrival airport cell.
- Type or confirm the airport name.
- If the airport does not exist yet, open the custom airport dialog.
- Place the airport on the map or confirm the suggested point so latitude and longitude are saved.
- Save the airport and wait for the preview row to refresh.
- Confirm that the airport warning is cleared before moving to import.
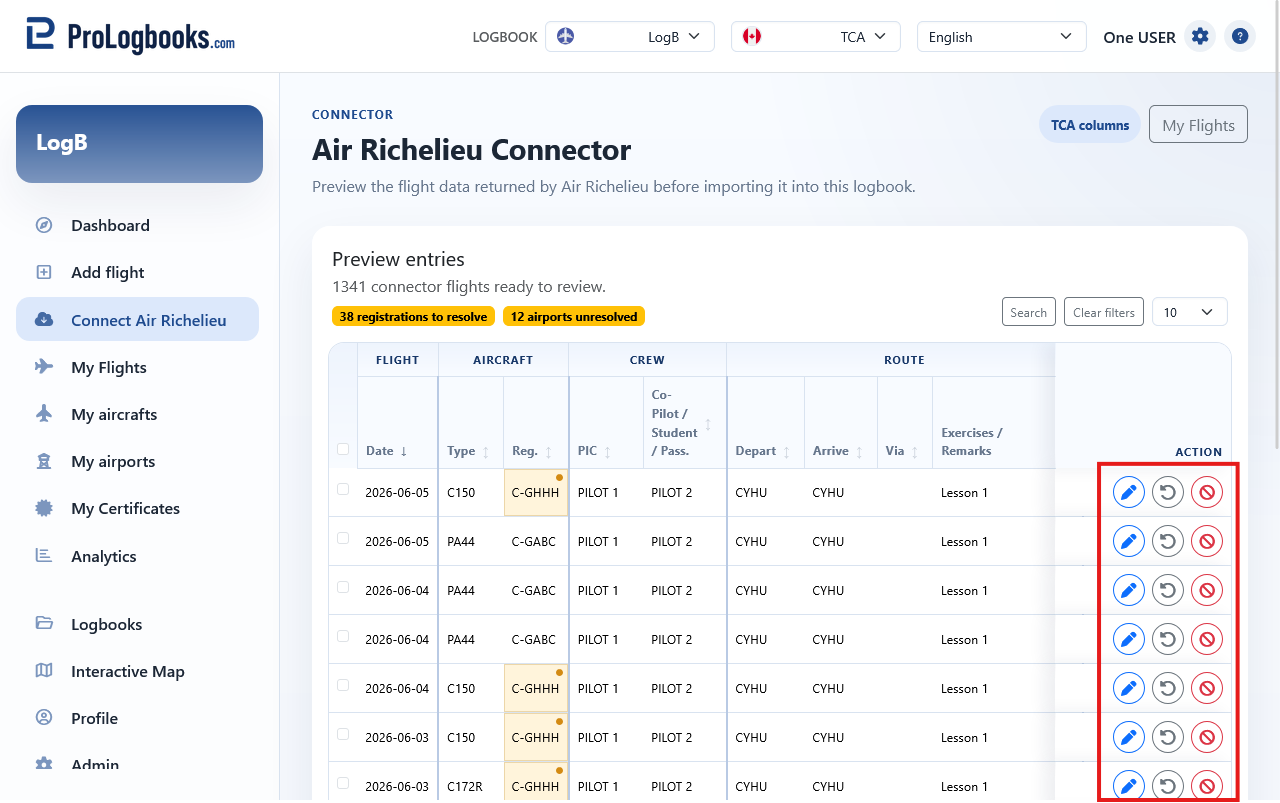
Understand the Actions buttons
Each preview row has an Actions button at the far right of the table. The button with the more icon opens the row actions so you can work on that one staged flight without affecting the other preview rows.
Edit opens the staged flight in the preview edit form. Use it when a row needs a full review, field corrections, route-map airport selection, or flight-file changes before import.
Reset values restores that staged row back to the original values returned by the connector. Use it when your preview edits made the row worse or when you want to discard manual changes and start again from the connector data.
Ignore preview flight marks the row as not importable. The row remains visible, but it is struck through, its selection checkbox is disabled, and Import selection or Import all skips it. Restore preview flight appears on ignored rows and makes the row importable again.
The page also has workflow buttons outside the row Actions menu. Search shows or hides the filter row, Clear filter removes the current filters, Resync all reloads the preview from the connector and discards current preview edits after confirmation, Import selection imports only the checked rows, and Import all imports every importable row that is not ignored.
Ignore rows you do not want to import
The ban action marks a preview row as ignored. Use it when the connector returns a flight that should not become part of this logbook, such as a duplicate, a row for another pilot, or a record you intentionally keep outside your personal logbook.
Ignoring a row does not delete anything from the partner system. It only tells this logbook not to import that partner row. The row stays visible in the preview, is shown with a strike-through style, and is skipped by Import selection and Import all.
If you resync, the connector may return the same row again, but the preview remembers the ignored partner row and keeps it marked as ignored.
The yellow circle-check action restores the row. Use it if you ignored the row by mistake or later decide the flight belongs in your logbook.
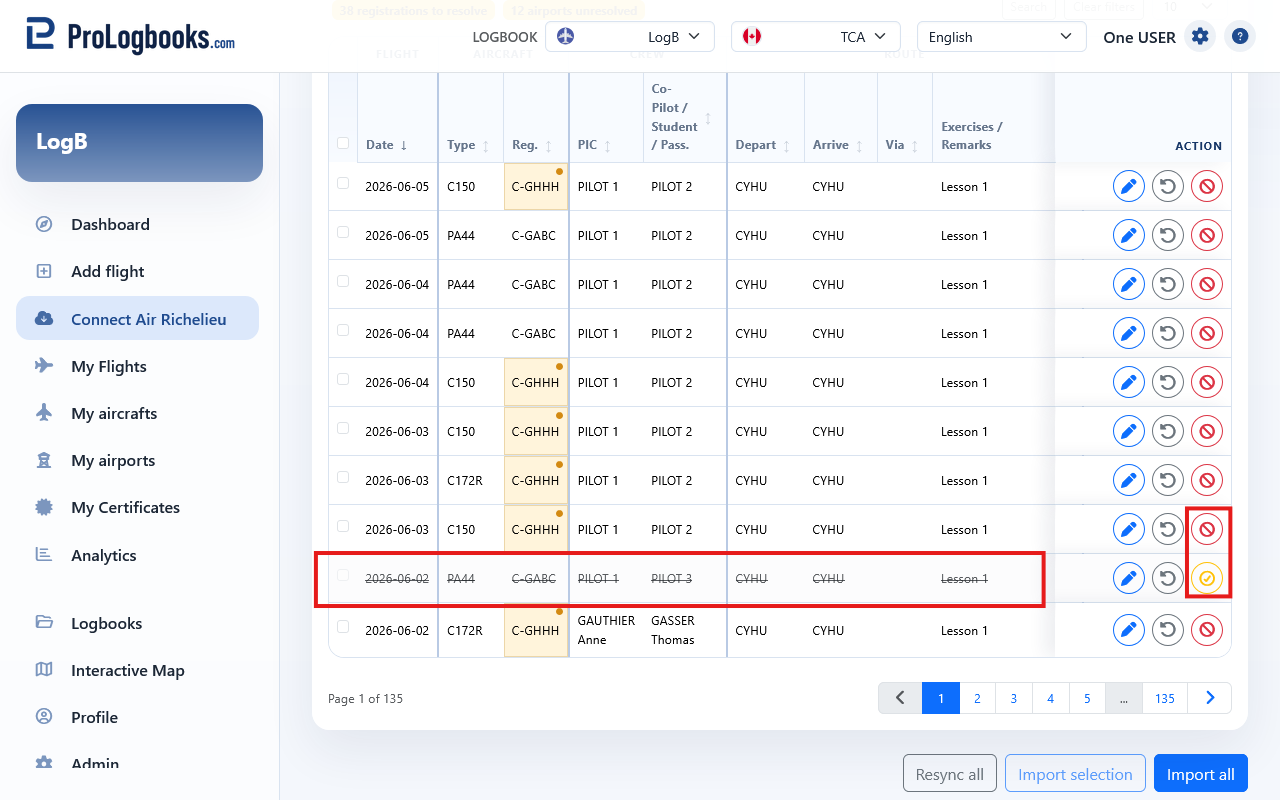
- Open the row Actions menu.
- Choose Ignore preview flight to mark the row as not importable.
- Confirm that the row is struck through and no longer selectable.
- Choose Restore preview flight if the row should become available for import again.
Import only after the preview looks correct
Review the rows, fix unresolved items, and then start the import. After import, the flights move into the regular My Flights area where you can search, open, and export them like any other saved flight.
Use this page as a controlled review step, not as a place to ignore bad data. A careful preview saves cleanup work later.
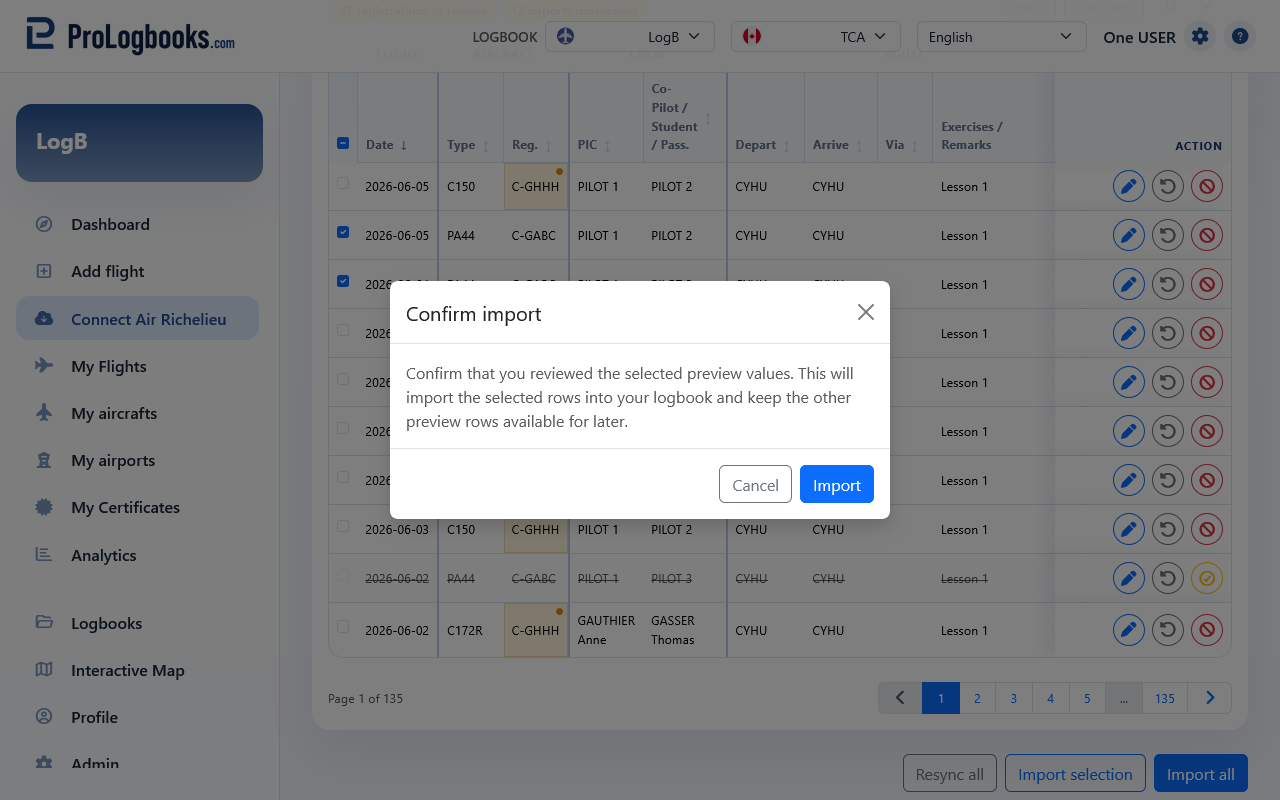
- Check that the unresolved badges are gone or reduced to the items you still plan to fix.
- Select the rows you want to import, or use the import-all action if the whole preview is ready.
- Start the import and wait for the confirmation.
- Open My Flights afterwards to verify that the imported rows are now part of the normal saved logbook.
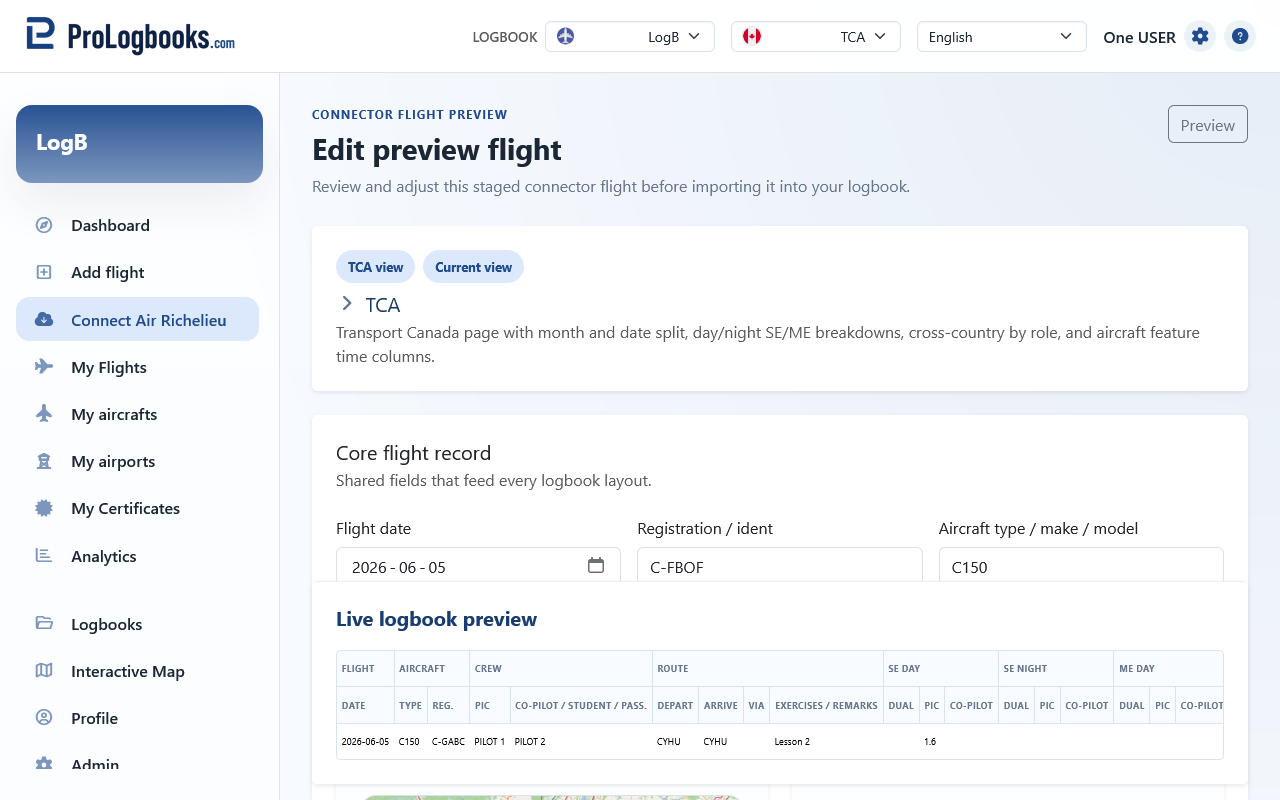
Open Edit preview flight when one row needs more work
Some preview rows need more than a quick yellow-cell correction. In that case, open the preview flight edit page so you can review the whole row in the normal flight form.
That preview edit page also keeps the interactive route map. On desktop, right-click the map near the airport you want to use. On a phone or tablet, tap the map instead. The page then shows nearby airports for that point and can fill the departure field first, then the arrival field.
If your current plan includes file uploads, that edit page also shows the Flight files card near the end of the form. Add or remove the files you want to keep with that staged flight, save the preview row, and then return to the connector preview.
- Open the preview flight you want to review in detail.
- Correct the flight fields that still need attention.
- Use the route map when the departure or arrival airport is easier to pick from nearby airports than to type manually.
- Use the Flight files card if you need to attach or remove supporting files before import.
- Save the preview flight and return to the connector preview list.
- Import the row only after both the flight data and the attached files look correct.
If something goes wrong
- If the connector page does not open, the current plan may not include connector access or the current logbook may not be linked to a connector.
- If you believe you should have connector access, contact the partner connector and ask them to confirm that your ProLogbooks email address is included in their allowed users list. ProLogbooks does not add or manage connector users for partners.
- If unresolved registrations or airports remain, finish those fixes before assuming the import is ready.
- If the dialog closes without saving, reopen the same yellow cell and complete every required field before saving again.
- If the Flight files card is missing on a preview edit page, the current plan may not include file uploads for flights.
- If a preview looks empty after refresh, the connector may not have new flights available for the current logbook at that moment.